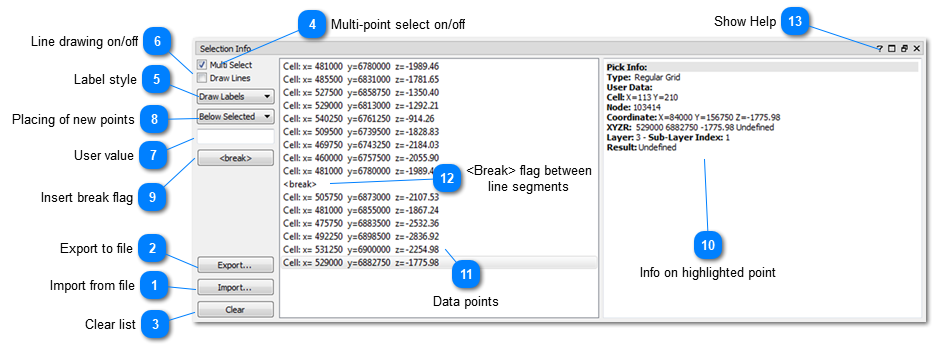
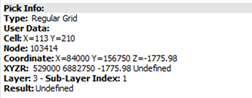
The Selection Info window (depicted in Figure 5.127) displays the currently selected points within the model. This window is divided into three panels: the leftmost panel contains buttons for managing the picking options and saving/loading point sets to/from a file. The central view displays a list of all the picked points, while the rightmost view presents detailed information about the currently highlighted (active) point.
The "Multi Select" option permits the selection of multiple points, while the "Draw lines" checkbox allows you to enable or disable line drawing between the selected points. Different line segments are separated by "break" flags, which can be inserted by clicking the "break" button. The user value text field provides the ability to assign a specific user value (either numerical or text) to the selected points. Actions like moving, duplicating, and deleting points can be performed via the right-click (RMB) menu within the points list view or using keyboard shortcuts.
You can export the picked points to or import them from ASCII .csv files using the "Export" and "Import" buttons. The "Clear" button removes all the selected points from the list.
For more detailed information on picking and editing point datasets, refer to the descriptions for digitizing and fault editing.
Figure 5.41: Selection Info window.
Import from file
This will bring up a file selection dialog where the user can choose a file to import. Supported formats include comma-separated table files (.csv) and polygon files (.pol, .fau, .xyz). See Input data types chapter for more details on supported formats. Also accessible via the button in the Selection Info toolbar.
This will open a file selection dialog where the user can choose where to save the Selection Info data points (in .csv format). If an existing file is chosen, the user is given the option to either overwrite or append to the existing file. Also accessible via the button in the Selection Info toolbar.
This option must be checked in order to pick multiple points. If not activate, the picked point will be replaced each time a new point is selected. Toggling this option on/off will also clear the selection info list. Also accessible via the button in the Selection Info toolbar.
Select how labels (annotations) should be displayed. By default, the Draw Labels option which shows X,Y,Z and Scalar value is active. Use the No Labels option to turn off labels completely. The list can also be viewed in the Selection Info toolbar
New digitized points will be assigned the value (numerical or string) entered in this text field. It is also possible to change the value of selected points by pressing <Enter> in the text field. <CTRL + ENTER> will assign the user value to all points belonging to the same segment.
This drop-down menu controls where new digitized points will be placed (e.g. at top or bottom of the list or above/below the currently selected point). The "Auto" option is chosen by default. With this option, new points will be inserted before the selected point if it's at the beginning of the polygon; otherwise, they will be inserted after the selected point.
This will insert a segment line break flag at the highlighted position in the list. If no item is selected, the flag will be added at the end. It is also accessible via the button in the Selection Info toolbar.
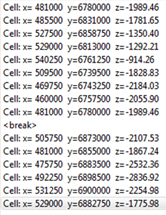
This list shows the current set of data points. For each point, the X,Y and Z values are shown. Points that have been picked on a layer will be prefixed "Cell", while points not attached to a surface will be prefixed "3D". Commands for moving, closing and deleting points and segments are available both from the <RMB> menu and from the Selection Info toolbar.